

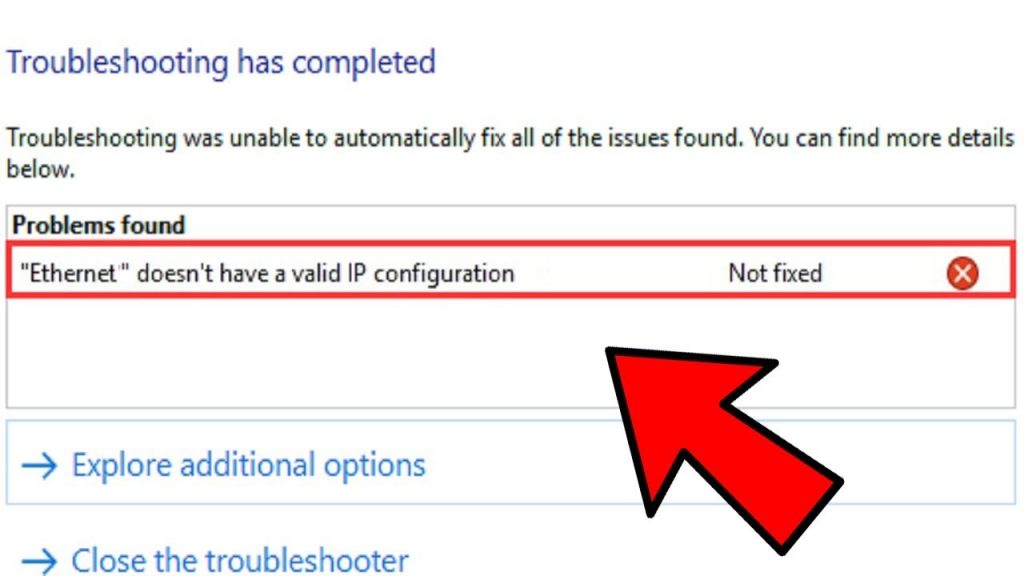
“Ethernet doesn’t have a valid IP configuration” is a common error that every user must have faced once in his lifetime, but ironically, there are not many solutions available over the internet to troubleshoot this problem.
It is quite irksome when you find an error in accessing your internet when you have to send an important e-mail, or the situation might be even worse.
But, don’t worry, your saviour is here, we will show you a step to step guide to fix the “Ethernet’s Invalid IP Config” error.
What Is An Internet Protocol (IP)


An IP is an address that establishes communication over one to another device to access the internet via a network that is based on many such IP addresses. So, basically, an IP is the address or identity of your current device over an internet network.
Just like the address of your home or your workplace, the IP of your device has a uniquely specified address that cannot be specified or allocated by other users.
Types of IP Addresses: There are several kinds of IP addresses, such as Private IP, Public IP, Static IP, and Dynamic IP. Also, they can be classified further into IPv4 or IPv6 types.
Reason for Occurring Error “Ethernet doesn’t have a valid IP configuration”
The invalid Ethernet IP configuration error indicates that your operating system (Windows 10 in this case) is not receiving the necessary IP configuration from the Dynamic Host Configuration Protocol (DHCP) as your ethernet connection no longer assigns a valid IP address over it.
Now understand, what is DHCP? The DHCP is a network protocol arrangement that enables a server to assign an IP to your device for a specific kind of network automatically.
If you receive an “Ethernet doesn’t have a valid IP Configuration” error, it means your device could not be allocated a valid IP address and is not able to communicate with your desired network, and that is why you would not be able to connect your device with the internet.
Also Read : How to Fix err_cache_miss in Google Chrome
What Causes “Invalid Ethernet IP Address” Error?

The “Ethernet doesn’t have valid IP Configuration” error emerges because of an incorrect, out of fashion, inaccurate network adapter drivers, as they are unable to pick a valid IP for a specified network.
In some cases, simply uninstalling and then reinstalling the network adapter drivers of your device, but sometimes that simple solution doesn’t work, and you might have to try some other solutions.
Don’t worry; here is a list of possible solutions that can help you cope up with this bothersome error.
1: To Reinstall TCP/IP
2: To Uninstall and then Re-install Your Network Adapter Drivers
3: To Change The Network Adapter Settings Of Your Device
4: And, To Fix The Error By Via Command Prompt
If you do not understand any of these solutions, here we have a step to step guide to fix this invalid ethernet IP config error.
Go Through Step By Step Guide to Fix Error- “Ethernet Doesn’t Have A Valid IP Configuration”
1. To Reinstall Winsock TCP/IP:
Usually, an inaccurate TCP/IP protocol is responsible for this invalid ethernet IP config error, to fix this error:
- Press window key and X at the same time, then click on Network Connections in the popped-up menu.
- Then run the following command to reset and reinstall the Winsock protocol on your device.
“netsh Winsock reset”
- After that, execute the following commands to reset the TCP/IP settings
“netsh int TCP reset”
“netsh int IP reset”
- Then, restart your PC to make these changes happen.
In case this simple solution doesn’t work for your device, you can try our next fix.
2. Update and Re-Install Network Adapter Drivers:

To find the right version of the network adapter driver for your device, it is suggested to search one on your device’s manufacturer’s official website.
If you do not find one, you can find it over other sites too, just make sure it is compatible with your windows version and existing network card.
1) Download the right version of the network adapter card driver from the internet.
2) Sometimes your existing network adapter might be corrupted and might not function correctly, or incompatible driver might be causing errors; in such case updating the existing driver can also help.
Another Related Guide : How to Restore Tabs in Chrome
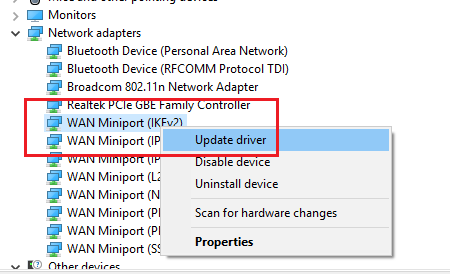
3) Press X on your keyboard along with the Window key, and in the popped-up menu, click on the device manager option.
4) Find the Ethernet Network Adapter in the list of your devices, then right-click over it to update the driver software. After that, you might choose – “Search automatically” or “Browse My Computer For Driver” option.
5) If updating doesn’t work, browse the location of your downloaded version of the network card driver and update your adapter with this.
6) Sometimes, you might need to restart your computer to make the changes happen, so, better you restart your PC and then try to connect the internet.
3. Change Network Adapter Settings:
Sometimes, everything on your device’s hardware is working well, but your network settings might be faulty, in case, you would not be connected to any internet connection, to troubleshoot this error:
1) Press Window Key along with the X on your keyboard, then select Network Connections from the popped-up menu.
2) Find the network card adapter that you are using, then right-click over it.
3) Tap on Internet Protocol Version 4 & Properties.
4) Then try obtaining DNS server address automatically and also “Obtain An IP Address Automatically”
5) If your problem persists, enter 192.168.1.14 with subnet mask 255.255.255.0 and default gateway 192.168.1.1 and DNS servers like 8.8.8.8 and 8.8.4.4
6) Then click on OK to make the changes happen, and see if this fix works for you.
4. Fix The Error Via Command Prompt:
If the resetting the network settings on your device also does not work, you can fix the error by running the command prompt.
1) Press window key along with the X key on your keyboard, then click on Command Prompt.
2) If you are asked for admin permissions, press on yes to keep the process on.
3) When the command prompt window emerges, type a few commands to make some changes in your IP configuration.
ipconfig/flushdns
nbtstat -R
nbtstat -RR
netsh int ip reset c:\resetlog.txt
netsh Winsock reset
4) Now you need to reboot your device to let these changes happen.
5) After your device restarts, open Network Connections.
6) Find your desired Network Adapter and right-click to disable it.
7) Then enable the network adapter again, now see your internetworking.
If any of these tricks don’t work for you, try checking your LAN cables or WiFi device and Modems if they are connected in the right way and are functioning properly.
Let us know in comments if you were able to fix this by applying the above steps.


